Thursday 30 June 2011

GLink Tool for sending eMails


Glink is the tool created by Shivram, SA, Puttur SK Region  for sending email with or w/o attachment directly by the Gmail account holder without accessing gmail site. With lot of limitations, this tool may find useful to you in your office/personal use. This tool contains : 1.Glink exe and 2. Contacts.ini file.Copy both these files to your PC and create a shortcut for Glink to the Desktop. Edit the Contacts.ini file (in notepad) as per your need. You can add up to 100 email IDs.The Sender name in the ini file must be your name. You can however change the name when using the exe.
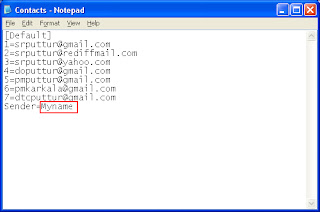
Contacts.ini file

In the Login screen, type your gmail ID. Press Enter. Please note that the ID should not contain@gmail.com. Then type the Password of your google ID. Press Enter or click Sign in. If you do not want to continue, you can click exit which closes the application.
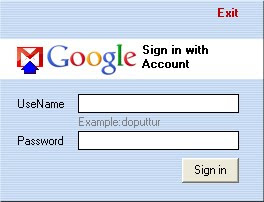
In the next Window,the name of the Sender will appear as per the configuration done in Contacts.ini. You can change here itself if desired. Select the to ID from the Drop down menu. If the ID intended is not added in the contacts.ini file,it will not appear here.You can also type any ID here. Mention the Subject.Attachment is not mandatory. If attachment is there, then click Browse button.Select the required file. Any file permissible by Google can be attached.


After completing the Message,click Send button. If all the inputs are correct, Message will be sent. When the "Message sent" message appears, click OK. Now you can send the same message to other IDs also if needed simply selecting the ID and clicking Send button.

Click the below button to download Glink.

Wednesday 29 June 2011

How to quickly insert horizontal lines in Word documents

When you want to quickly insert a horizontal line into your Word document, you don’t have to type the line manually or even go to the menu looking for a ‘Insert horizontal line’ button.
All you have to do is type three characters on your keyboard and hit enter, and a horizontal line will appear. There are 6 different horizontal lines that you can create.

— (3 dashes) and Enter – This will give you a simple straight line.
___ (3 underscores) and Enter – This will give you a thicker, almost double layer horizontal line.
### (3 hashes) and Enter – This will give you a thick line with two thin ones surrounding it.
*** (3 asterisk) and Enter – This will give you a dotted horizontal line.
=== (3 equals signs) and Enter – This will give you a double line.
~~~ (3 tildes) and Enter – This will give you a zig zag horizontal line.


How to Repair a SQL Suspected Database


Sometimes when you connect to your database server, you may find it in suspect mode. Your database server won’t allow you to perform any operation on that database until the database is repaired.

A database can go in suspect mode for many reasons like improper shutdown of the database server, corruption of the database files etc.

To get the exact reason of a database going into suspect mode can be found using the following query

DBCC CHECKDB (‘YourDBname’) WITH NO_INFOMSGS, ALL_ERRORMSGS

Output of the above query will give the errors in the database.

To repair the database, run the following queries in Query Analyzer,

EXEC sp_resetstatus ‘yourDBname’;
ALTER DATABASE yourDBname SET EMERGENCY
DBCC checkdb(‘yourDBname’)
ALTER DATABASE yourDBname SET SINGLE_USER WITH ROLLBACK IMMEDIATE
DBCC CheckDB (‘yourDBname’, REPAIR_ALLOW_DATA_LOSS)
ALTER DATABASE yourDBname SET MULTI_USER


     You should keep one thing in mind while using the above queries that the repair mode used here , REPAIR_ALLOW_DATA_LOSS, is a one way operation i.e. once the database is repaired all the actions performed by these queries can’t be undone. There is no way to go back to the previous state of the database. So as a precautionary step you should take backup of your database before executing above mentioned queries.

Tuesday 28 June 2011

How to setup Netgear or any Wireless Router Network

        Modern communication relies heavily on Wireless Networking and it is therefore gaining popularity for Home and Business Networking. Wireless Networking offers the advantage of mobility and eliminates the use of cables. Computers at home or in a small office can easily be connected through Wireless Networking.

Setting up a secured network through a Netgear or any Router will keep your data free from spying and avert entry of any uninvited user into your network. You will have to follow certain guidelines to set up a Secured Wireless Network that will be provided either through Wireless Protected Array (WPA) or Wireless Encryption Protocol (WEP).


GUIDELINES
Connect to Modem
Power off your modem.
Connect one end of the Ethernet Cable to the ‘input’, marked at the backside of the router and other end to the modem.

Power Modem back on.
Generally it is a good rule to wait at least a minute before continuing to the next step.
Connect to Computer
·                       Connect one end of a second Ethernet Cable to one of the available ports on the Router. Most modern Routers include four ports.
Power your Router
·                       Plug your Router to a power source and wait till until your Router’s LED signals that it is connected to the internet. Generally Routers have a green LED indicator that turns solid when connected.
Install Software and Drivers
·                       If your Router included a disk to install Drivers, insert disk and continue following the disks instructions to install Drivers and set up your Network.
·                       If your Router does not include a disk continue to next steps.


Configure your Network
·                       Take note of the Router’s IP address that is selected automatically (default) and mentioned in the user’s guide. Most Routers by default use, http://192.168.1.1 as the default IP address
·                       Open your default web browser and type in the router’s address in the provided empty search field.
·                       Insert a valid Username and Password. If you have not set one up and it requires one, the default for most brands of Routers is, Username: Admin, Password: Password.
·                       You can also get to your Routers (Homepage) by going to Start Menu\Control Panel\Network and Sharing Center. Click the center icon at top, which usually has the house as an icon if you saved your Network as a Home Network. On the next page under Network Infrastructure you should see your Router listed. Just Right-Click your Router Icon and you should have a menu option to view Homepage.
Basic settings
·                       Choose your Basic Settings such as Router Name, and IP Addressing
·                       Locate Wireless Security or Wireless Settings. Choose a name(SSID) for your Network that you can easily identify and whether you wish to broadcast your Wireless Signal.
·                       Select channel to broadcast on, by default a Router usually has this set to Auto which is fine for most users.
·                       Select Wireless Mode. This is your speed for your wireless. Example: 54Mbps, 145Mbps and 300Mbps.
For your Wireless Security settings, most modern Routers include the following types of security:
·                       None – No security. Not recommended if you are in an area where someone who lives next door to you could use your Wireless Connection to connect to the Internet.
·                       WEP – Older security encryption used for Wireless Networks with better options now available. This option does not give a password but a unique key that users enter to connect.
·                       WPA-PSK[TKIP] – Better security than WEP and sometimes users still use this if they have issues with devices connecting. Still a great Security Option. There is a 54Mbps limit on this connection using Legacy G.
·                       WPA2-PSK[AES] – Newer security using N support and if you have no issues with devices connecting this is the recommended Security Option as it gives you the best security.
·                       WPA-PSK[TKIP]+WPA2-PSK[AES] – If you have issues with devices connecting you can use this setting as it gives you a combination of WPA and WPA2.
Another thing to note outside of setting up your Router is setting up Sharing for Computers and Devices connected to your Network. Windows 7 has come along way in making this easier for users and most users can do this by following the walk-through in Windows.

Source : http://www.thewindowsclub.com

Monday 27 June 2011

IDrive: Get FREE 12 GB Space for Online Data Backup


I recently switched my Online Data Backup service to IDrive and I must say that it has really impressed me alot. The service is very fast and offers a decent desktop client and an explorer plugin for quick file/folders backup.
You can easily configure scheduled backups, manage bandwidth use, perform fast restores and backup data on mapped drives.


IDrive Standout Features:
* Keeps deleted files for 30 days
* Can backup file changes as often as every 10 minutes (real time backup)
* Saves up to 30 versions of a file (file versions)
* Can manage multiple accounts through a single account
* Has a bandwidth throttle for controlling bandwidth usage (auto-controlled upload/download speed)
This service is extremely easy to use and provides backup scheduling by the day, week, time and month. It provides continuous backup and can be configured to backup changes in files as often as every 10 minutes. IDrive can also backup mapped drives such as from external drives that are connected to your computer. You can even restore from a specific time frame and not just from the most recent backup.
IDrive offers a pretty decent pricing structure for their Personal Use and Pro for Business packages. IDrive also provides a 2GB account for free. You can store up to 2 GB of data in the free account and try out all the features of IDrive but you can avail an extra 10 GB of space absolutely FREE just by referring your email contacts.


To get the additional free space:
1. Sign in to IDrive.com go to upgrade account.
2. Click Refer IDrive to your friends.
3. Give any of your email address and password to IDrive (which is absolutely secure). Make sure you have more than 5 contacts in your contact list of that email address.
4. You’ll immediately get the additional 10 GB of free space. For the confirmation you’ll receive an email.
Enjoy your huge FREE 12 GB (2+10GB) of online backup account!
Get your free backup space now on IDrive.com

Send HTML Emails without any login


You can use the previously mentioned WYSIWYG editor to generate the HTML markup and copy-paste that code into the Google Docs form. Also, if you wish to send the same message to multiple recipients at once, just separate their email addresses with commas.


Send HTML Emails with Gmail and Google Docs


All popular email programs – from web-based Gmail and Yahoo! Mail to desktop-based Microsoft Outlook to the mail app on your mobile phone – are now HTML (or rich-text) capable. Thus, your email messages can have custom fonts, inline images, lists, tables and other formatting similar to a web page.
But there’s one little problem - how do you write an HTML email?
The built-in WYSIWYG editors, like the one shown above, offer basic functions for formatting text but there are things you cannot do. For instance, how do you insert a 3x5 table inside a Gmail message? Can you right-align an image and wrap text around it similar to Word?

All this is easily possible in HTML but since your email program won’t let your compose a message directly in HTML, you’re stuck.
I have two easy solutions for this problem. The first is HTML Mail – here you can write an HTML message and send it yourself or anyone else with a click. The tool has a simple WYSIWYG editor but you can also switch to the code view and compose messages directly with HTML markup.
There’s another alternative that uses Google Docs to send HTML mails from your Gmail account itself. It works for both Google Apps and regular Google Accounts.

First make a copy of this Google Docs sheet and then choose Gmail –> HTML Mail to authorize the sheet to send mails from your email account. Once authorized, choose GMail –> HTML Mail again and now you should see a form for sending mails. Fill in the various fields, write any HTML code in the Message field and hit send.
You can use the previously mentioned WYSIWYG editor to generate the HTML markup and copy-paste that code into the Google Docs form. Also, if you wish to send the same message to multiple recipients at once, just separate their email addresses with commas.
The Google Docs option internally uses Google App scripts (class GmailApp) and you can find the full source code under Tools –> Script Editor. So the next time you want to create a more professional-looking email newsletter that has tables and other complex formatting, you know where to go.
Courtesy : www.labnol.org

Sunday 26 June 2011

6 Security Tips To Keep Your Gmail Account Secure


Why the safety of Gmail is of great importance? This is because Gmail has been one of the most popular user-friendly internet mail services that is being offered online and is being used by millions of users.
Nevertheless, this most common online email service is also prone to hacking. Therefore, it is a necessary that you need to protect your Gmail account, and many of the other resources that are linked with your Gmail account like Adsense, Analytics, Orkut, Buzz, YouTube, Facebook and much more.
Here are some security tips to do so:
1. Always use https protocol
https, which is an internet server protocol that will allow the passage of your account via a secured connection, the use of https is always and is highly recommended, especially when you are operating in internet cafe and public network. You do not have to twist your fingers or break your neck to get this done, all you need to do is to go the General Settings tab and enable “always use https” option.

2. Choose a unique security question

Try to be creative in choosing your unique question that has a very difficult answer for the hacker to decode, for someone whom you know very well is the one who will always be the one to hack your account. The person who hacks into your account effectively and easily is the ones who know your background information very well. Moreover, this is a good practice to keep changing your secret question, password recovery options and recovery email address very often.

3. Use strong passwords

The best way to check how strong is your password, that even the closest person will not be able to decode and hack into your account is by using a small tool like Microsoft password manager, which increases the strength of your password. The use of this small tool is much more efficient than the one that Google uses.

4. Check you IP login session information regularly

It is a good habit to keep track of your Gmail account activity, which usually comes at the bottom of your Gmail account page and check the last account activity, which will let you know whether someone has been accessing your account after you have used your account. Whomever illicitly logs into your account after you have accessed will be available, that is, you will be getting to know whether someone has been accessing your account or not.

5. Back up your emails

It is possible that some time you may lose your account to a hacker, who does this with or without an intention. Therefore, it is a good habit to have another back up email id and download all the emails from your primary email address to your back up email id. Isn’t this good that Google has the opportunity that you can create as many email ids that you want?

6.Use keyscramblers to protect from keyloggers

Keyloggers are sneaky little programs that can slip pass the security software and like a Trojan virus to steal your personal information. The best way to protect your Gmail account is to use keyscramblers, which is necessary to prevent and identify the keyloggers.

Thursday 23 June 2011

Central Sector Scheme of Interest Subsidy on Educational Loans


Ministry of Human Resource Development
Central Sector Scheme of Interest Subsidy on Educational Loans
The Ministry of Human Resource Development launched during 2009-10 a new Central Scheme to provide full interest subsidy during the period of moratorium on educational loans for students belonging to economically weaker sections (with parental family income from all sources of less than Rs.4.5 lakh annually), from scheduled banks under the Educational Loan Scheme of the Indian Bank’s Association (IBA). The loans are for pursuing of studies in professional/technical streams from recognized institutions in India, subject to a loan ceiling of Rs.10 lakhs.
Under the Scheme, proof of income is required to be certified by authorities to be designated by the State Governments. Accordingly, the Ministry has written to all Chief Secretaries of States/Union Territories to intimate the designated authority/authorities (at the District/Sub-District/Block, etc. levels) to the District level Consultative Committee (DLCC) so that banking authorities at the branch level where students would be approaching for availing the scheme would be aware of the same. The eligible students may get the details of designated authorities from the concerned branch of the Bank where they have availed of loan.

All Scheduled Member Banks of the IBA have also been advised to take necessary action to adopt and implement the Scheme so that the benefits of the Scheme accrue to the eligible students. Canara Bank is the Nodal Bank, for the Member Banks of IBA, for claiming reimbursement of interests to student accounts.
The details of the Scheme as well as the above communication are available on the website of the HRD Ministry at www.education.nic.in.
All eligible students who wish to avail of the benefits of the Scheme, are advised to approach the respective bank branch from where they availed of the education loan and complete the necessary formalities including obtaining the certification in respect of annual family income from the competent authority at the Block/Tehsil/District Level, so that the individual students accounts could be credited with he interest due on the Loans for the academic year 2009-10 onwards. Those who have already submitted such Certificates are not required to submit them again. The last day for submitting Certificates by students to respective branches is 20.07.2011.

Higher Education Loan Interest Waiver- Apply before 20th July 2011


As per Press release of Press Information Bureau, Government of India, all eligible students for Central Government Scheme for Interest Subsidy on education loan can get exemption from payment of interest on the education loan which is due on the loans for the academic year 2099-10 onwards.
The last day for claiming this exemption is 20.07.2011. Those already applied for this exemptionneed not apply again.
All Scheduled Member Banks of the IBA have also been advised to take necessary action to adopt and implement the Scheme so that the benefits of the Scheme accrue to the eligible students. Canara Bank is the Nodal Bank, for the Member Banks of IBA, for claiming reimbursement of interests to student accounts.
The loans are for pursuing of studies in professional/technical streams from recognized institutions in India, subject to a loan ceiling of Rs.10 lakhs.
The details of the Scheme as well as the above communication are available on the website of the HRD Ministry at www.education.nic.in.

Central Government has provided this Interest Subsidy (CSIS) taken by students under educational loan scheme of Indian Banks Association (IBA), to pursue Technical/ Professional education studies in India.
The scheme is effective from the academic year 2009-10.
The benefits of the Scheme would be applicable to those students belonging to economically weaker sections(EWS), with an annual gross parental/family income upper limit of Rs.4.50 lakhs per year (from all sources).

Some of the salient features of the scheme :

The Governemt of India has approved a scheme to provide full interest subsidy during the period of moratorium i.e. Course Period plus one year or six months after getting job, whichever is earlier, on loans taken by students belonging to Economically Weaker Sections from scheduled banks under the Educational Loan scheme of the Indian Banks’ Association, for pursuing any of the approved courses of studies in technical and professional streams, from recognised institutions in India
The Scheme would be applicable only for studies recognised Technical/Professional Courses in India. The interest subsidy shall be linked with the existing Educational Loan Scheme of IBA and restricted to students enrolled in recognised Technical/ Professional Courses (after Class XII) in India in Educational Institutions established by Acts of Parliament, other Institutions recognised by the concerned Statutory Bodies, Indian Institutes of Management (IIMS) and other institutions set up by the Central/State Government.
Objective of the Scheme
The Governemt of India has approved a scheme to provide full interest subsidy during the period of moratorium i.e. Course Period plus one year or six months after getting job, whichever is earlier, on loans taken by students belonging to Economically Weaker Sections from scheduled banks under the Educational Loan scheme of the Indian Banks’ Association, for pursuing any of the approved courses of studies in technical and professional streams, from recognised institutions in India
Applicability of the Scheme
The Scheme would be applicable only for studies recognised Technical/Professional Courses in India. The interest subsidy shall be linked with the existing Educational Loan Scheme of IBA and restricted to students enrolled in recognised Technical/ Professional Courses (after Class XII) in India in Educational Institutions established by Acts of Parliament, other Institutions recognised by the concerned Statutory Bodies, Indian Institutes of Management (IIMS) and other institutions set up by the Central/State Government.
Interest Rates
The interest rates charged on the educational loan shall be as per the BPLR/Base Rate of the Individual Banks

Moratorium Period
Under the scheme, the interest payable by the student belonging to EWS for availing of the Educational Loan for Technical/Professional Courses in India for the period of moratorium i.e. Course Period plus one year or six months after getting job, whichever is earlier. After the period of moratorium is over, the interest on the outstanding loan amount shall be paid by the student, in accordance with the provisions of the existing Educational Loan Scheme of Banks and as may be amended from time to time, whichever is earlier.

Income Limit/Proof
The benefits of the Scheme would be applicable to those students belonging to economically weaker sections(EWS), with an annual gross parental/family income upper limit of Rs.4.50 lakhs per year (from all sources). The scheme is intended to cater to the needs of students belonging to EWS with prescribed upper parental gross income limit of the family from all sources, which is based on economic index and not on social background. The scheme is independent of any other schemes which may cater to Economically Weaker Sections.

Competent Authority
The Ministry of HRD, Government of India shall issue an Advisory to all the State Governments requesting them to designate appropriate authority or authorities who are competent to issue income certificates, based on economic index and not social background, for the purpose of this scheme. The Banks shall implement the Scheme based on the notification of the certification authority by State Governments communicated through District Level Consultative Committees (DLCCs).

Eligibility for Interest Subsidy
The interest subsidy under the Scheme shall be available to the eligible students only once, either for the first undergraduate degree course or the post graduate degrees/ diplomas in India. Interest Subsidy shall, however, be admissable for integrated courses (graduate+ post graduate). Interest subsidy shall not be available for the following student borrowers, Those students once they discontinue the course midstream, or who are expelled from the Institutions on disciplinary or academic grounds. However, the interest subsidy will be available only if the discontinuation was due to medical grounds for which necessay documentation to the satisfaction of the Head of educational institution will have to be given

Nodal Bank
The Scheme shall be implemented through Canara Bank, which is the Nodal Bank for the scheme. However, the student can apply under the scheme only through branch where educational loan is availed

Applicable Academic Year
The Scheme shall be applicable from the academic year 2009-10 starting 1stApril, 2009. The loan amount taken starting from the Academic Year 2009-10 (irrespective of the date of sanction) shall only be covered under the scheme of interest subsidy. Interest on any amount disbursed for courses starting before the academic year 2009-10 would not be considered for subsidy

List of Technical/Professional courses
Students enrolled in recognised Technical/Professional Courses (after Class XII) in India in Educational Institutions established by Acts of Parliament, other Institutions recognised by UGC/AICTE and other Statutory Bodies, Indian Institutes of Management (IIMS) and other institutions set up by the Central/State Government.

Indicative List of Eligible Courses
Under Graduate Courses and Post Graduate Courses in Engineering (B.E/ M.E, B.Tech/M.Tech,B.Arch/ M.Arch etc.) Medical/ Para Medical (MBBS/MD, B.SC/ M.Sc.Nursing,B.Pharmacy/M.Pharmacy, BPT/MPT, BOI/MOI,Siddha, Ayurveda, Homeopathy,Naturopathy etc.)Agriculture, Veterinary, Law, Dental (BDS/MDS), Management, Computer (MCA) etc.,Post Graduate diploma courses duly approved by AICTE/UGC and conducted byrecognized institutions.

Indicative List of Non Eligible courses
For studies in institutions abroad, courses pursued without completing class XII, Non Professional and Non Technical under Graduate and Post Graduate courses in Arts, Science, Commerce, Sociology, Music etc., Diploma Courses, Teacher Training Courses, Skill Development, Vocational Training courses etc.,